CANWEALLAGREETHATWEWILLAIMFORCLARITYASWENAMECLASSES? CanWeAllAgreeThatWeWillAimForClarityAsWeNameClasses?

I like to be productive and efficient. So anything that unnecessarily wastes even just a few moments of my time… well, it really bugs me.

That is why I am particularly bugged by a particular practice (nay, an anti-practice) that I see too often. FYI, AFAIK most folks would agree with me, so IDK why this anti-practice is so pervasive.

I’m talking about CamelCased class names with capitalized acronyms.

A camel
A camel. See if you can tell how this animal inspired the term “CamelCase”.

You see these fairly often in Java. EOFException. URLEncoder. ISBNValidator. Mercifully, the good folks who designed the java.net package decided to use Http rather than HTTP in class names, so we’re not cursed with the likes of HTTPURLConnection. Not so with Apple, however, as anyone who’s worked with Objective-C, or even Swift, can attest. The two-to-three-uppercase-letter classname prefix standard (for example, NSThis, NSThat, NSTheOther) is bad enough. But when you couple that with Apple’s overzealous penchant for capitalizing acronyms, you wind up reading AFJSONRequestOperations from your NSHTTPURLResponses.

A strange camel
The weird-ass camel that some language designers have apparently once seen.

SMH.

Though they’re rare, I’ve encountered programmers who voraciously favor the all-caps approach. The rationale is usually that it is, simply, proper grammar. And that’s fair enough. But guess what? It’s also proper grammar to put spaces between words, and to lowercase the first letter of non-proper nouns (unless your nouns are German). Yet we programmers happily break those grammatical decrees on a daily basis.

Instead of being GrammarSticklers, we should be crafting class names to convey the classes’ meanings as clearly and quickly as possible. It’s not that these class names are illegible. It’s simply that they are less legible than they should be. It takes an extra beat or two to understand them. And I don’t know about you, but I don’t like wasting beats.

Am I overreacting? IDK, maybe I am. But thanks for bearing with me anyway. I won’t waste any more of your time.

Collections and Encapsulation in Java Never, ever return null when you're supposed to be returning a Collection.

A core tenet of object oriented programming is encapsulation: callers should not have access to the inner workings of a class. This is something that newer languages such as Kotlin, Swift, and Ceylon have solved well with first-class properties.

Java—having been around for quite awhile—does not have the concept of first-class properties. Instead, the JavaBeans spec was introduced as Java’s method of enforcing encapsulation. Writing JavaBeans means that you need to make your class’s fields private, exposing them only via getter and setter methods.

If you’re like me, you’ve often felt when writing JavaBeans that you were writing a bunch of theoretical boilerplate that rarely served any practical purpose. Most of my JavaBeans have consisted of private fields, and their corresponding getters and setters that do nothing more than, well, get and set those private fields. More than once I’ve been tempted to simply make the fields public and dispense with the getter/setter fanfare, at least until a stern warning from the IDE sent me back, tail between my legs, to the JavaBeans standard.

Recently, though, I’ve realized that encapsulation and the JavaBean/getter/setter pattern is quite useful in a common scenario: Collection-type fields. How so? Let’s fabricate a simple class:

public class MyClass {

    private List<String> myStrings;

}

We have a field—a List of Strings—called myStrings, which is encapsulated in MyClass. Now, we need to provide accessor methods:

public class MyClass {

    private List<String> myStrings;

    public void setMyStrings(List<String> s) {
        this.myStrings = s;
    }

    public List<String> getMyStrings() {
        return this.myStrings;
    }

}

Here we have a properly-encapsulated—if not verbose—class. So we’ve done good, right? Hold that thought.

Optional lessons

Consider the Optional class, introduced in Java 8. If you’ve done much work with Optionals, you’ve probably heard the mantra that you should never return null from a method that returns an Optional. Why? Consider the following contrived example:

public class Foo {

    private String bar;

    public Optional<String> getBar() {
        return (bar == null) ? null : Optional.of(bar);
    }

}

Now clients can use the method thusly:

foo.getBar().ifPresent(log::info);

and risk throwing a NullPointerException. Alternatively, they could perform a null check:

if (foo.getBar() != null) {
    foo.getBar().ifPresent(log::info);
}

Of course, doing that defeats the very purpose of Optionals. In fact, it so defeats the purpose of Optionals that it’s become standard practice that any API that returns Optional will never return a null value.

Back to Collections. Much like an Optional contains either none or one, a Collection contains either none or some. And much like Optionals, there should be no reason to return null Collections (except maybe in rare, specialized cases, of which I can’t currently think of any). Simply return an empty (zero-sized) Collection to indicate the lack of any elements.

Sock drawer
The drawer still exists even when all the socks are removed, right?

It’s for this reason that it’s becoming more common to ensure that methods that return Collection types (including arrays) never return null values, the same as methods that return Optional types. Perhaps you or your organization have already adopted this rule in writing new code. If not, you should. After all, would you (or your clients) rather do this?:

boolean isUnique = personDao.getPersonsByName(name).size() == 1;

Or have your code littered with the likes of this? :

List<Person> persons = personDao.getPersonsByName(name);
boolean isUnique = (persons == null) ? false :persons.size() == 1;

So how does this relate to encapsulation?

Keeping Control of our Collections

Back to our MyClass class. As it is, an instance of MyClass could easily return null from the getMyStrings() method; in fact, a fresh instance would do just that. So, to adhere to our new never-return-a-null-Collection guideline, we need to fix that:

public class MyClass {

    private List<String> myStrings = new ArrayList<>();

    public void setMyStrings(List<String> s) {
        this.myStrings = s;
    }

    public List<String> getMyStrings() {
        return this.myStrings;
    }

}

Problem solved? Not exactly. Any client could call aMyClass.setMyStrings(null), in which case we’re back to square one.

At this point, encapsulation sounds like a practical—rather than solely theoretical—concept. Let’s expand the setMyStrings() method:

public void setMyStrings(List<String> s) {
    if (s == null) {
        this.myStrings.clear();
    } else {
        this.myStrings = s;
    }
}

Now, even when null is passed to the setter, myStrings will retain a valid reference (in the example here, we take null to mean that the elements should be cleared out). And of course, calling aMyClass.getMyStrings() = null will have no effect on aMyClass’ underlying myStrings variable. So are we all done?

Er, well, sort of. We could stop here. But really, there’s more we should do.

Consider that we are replacing our private ArrayList with the List passed to us by the caller. This has two problems: first, we no longer know the exact List implementation used by myStrings. In theory, this shouldn’t be a problem, right? Well, consider this:

myClass.setMyStrings(Collections.unmodifiableList("Heh, gotcha!"));

So if we ever update MyClass such that it attempts to modify the contents of myStrings, bad things can start happening at runtime.

The second problem is that the caller retains a reference to our underlying List. So now, that caller can now directly manipulate our List.

What we should be doing is storing the elements passed to us in the ArrayList to which myStrings was initialized. While we’re at it, let’s really embrace encapsulation. We should be hiding the internals of our class from outside callers. The reality is that callers of our classes shouldn’t care whether there’s an underlying List, or Set, or array, or some runtime dynamic code-generation voodoo, that’s storing the Strings that we pass to it. All they should know is that Strings are being stored somehow. So let’s update the setMyStrings() method thusly:

public void setMyStrings(Collection<String> s) {
    this.myStrings.clear(); 
    if (s != null) { 
        this.myStrings.addAll(s); 
    } 
}

This has the effect of ensuring that myStrings ends up with the same elements contained within the input parameter (or is empty if null is passed), while ensuring that the caller doesn’t have a reference to myStrings.

Now that myStrings‘ reference can’t be changed, let’s just make it a constant:

public class MyClass {
    private final List<String> myStrings = new ArrayList<>();
    ...
}

While we’re at it, we shouldn’t be returning our underlying List via our getter. That too would leave the caller with a direct reference to myStrings. To remedy this, recall the “defensive copy” mantra that Effective Java beat into our heads (or, at least, should have):

public List<String> getMyStrings() {
    // depending on what, exactly, we want to return
    return new ArrayList<>(this.myStrings);  
}

At this point, we have a well-encapsulated class that eliminates the need for null-checking whenever its getter is called. We have, however, taken some control away from our clients. Since they no longer have direct access to our underlying List, they can no longer, say, add or remove individual Strings.

No problem. If we can simply add methods like

public void addString(String s) {
    this.myStrings.add(s);
}

and

public void removeString(String s) { 
    this.myStrings.remove(s); 
}

Might our callers need to add multiple Strings at once to a MyClass instance? That’s fine as well:

public void addStrings(Collection<String> c) {
    if (c != null) {
        this.myStrings.addAll(c);
    }
}

And so on…

public void clearStrings() {
    this.myStrings.clear();
}

public void replaceStrings(Collection<String> c) {
    clearStrings();
    addStrings(c); 
}

Collecting our thoughts

Here, then is what our class might ultimately look like:

public class MyClass {

    private final List<String> myStrings = new ArrayList<>();

    public void setMyStrings(Collection<String> s) {
        this.myStrings.clear(); 
        if (s != null) { 
            this.myStrings.addAll(s); 
        } 
    }

    public List<String> getMyStrings() {
        return new ArrayList<>(this.myStrings);
    }

    public void addString(String s) { 
        this.myStrings.add(s); 
    }

    public void removeString(String s) { 
        this.myStrings.remove(s); 
    }

    // And maybe a few more helpful methods...

}

With this, we’ve achieved a class that:

  • is still basically a POJO that conforms to the JavaBean spec
  • fully encapsulates its private member(s)

and most importantly ensures that its method that returns a Collection always does just that–returns a Collection–and never returns null.

When to use Abstract Classes Abstract classes are overused and misused. But they have a few valid uses.

Abstract classes are a core feature of many object-oriented languages, such as Java. Perhaps for that reason, they tend to be overused and misused. Indeed, discussions abound about the overuse of inheritance in OO languages, and inheritance is core to using abstract classes.
In this article we’ll use some examples of patterns and anti-patterns to illustrate when to use abstract methods, and when not to.
While this article presents the topic from a Java perspective, it is also relevant to most other object-oriented languages, even those without the concept of abstract classes. To that end, let’s quickly define abstract classes. If you already know what abstract classes are, feel free to skip the following section.

Defining Abstract Classes

Technically speaking, an abstract class is a class which cannot be directly instantiated. Instead, it is designed to be extended by concrete classes which can be instantiated. Abstract classes can—and typically do—define one or more abstract methods, which themselves do not contain a body. Instead, concrete subclasses are required to implement the abstract methods.
Let’s fabricate a quick example:
public abstract class Base {

    public void doSomething() {
        System.out.println("Doing something...")
    }

    public abstract void doSomethingElse();

}
Note that doSomething()–a non-abstract method–has implemented a body, while doSomethingElse()–an abstract method–has not. You cannot directly instantiate an instance of Base. Try this, and your compiler will complain:
Base b = new Base();
Instead, you need to subclass Base like so:
public class Sub extends Base {

    public abstract void doSomethingElse() {
        System.out.println("Doin' something else!");
    }

}
Note the required implementation of the doSomethingElse() method.
Not all OO languages have the concept of abstract classes. Of course, even in languages without such support, it’s possible to simply define a class whose purpose is to be subclassed, and define either empty methods, or methods that throw exceptions, as the “abstract” methods that subclasses override.

The Swiss Army Controller

Let’s examine a common abuse of abstract classes that I’ve come across frequently. I’ve been guilty of perpetuating it; you probably have, too. While this anti-pattern can appear nearly anywhere in a code base, I tend to see it quite often in Model-View-Controller (MVC) frameworks at the controller layer. For that reason, I’ve come to call it the Swiss Army Controller.
The anti-pattern is simple: A number of subclasses, related only by where they sit in the technology stack, extend from a common abstract base class. This abstract base class contains any number of shared “utility” methods. The subclasses call the utility methods from their own methods.
Swiss army controllers generally come into existence like this:
  1. Developers start building a web application, using an MVC framework such as Jersey.
  2. Since they are using an MVC framework, they back their first user-oriented webpage with an endpoint method inside a UserController class.
  3. The developers create a second webpage, and therefore add a new endpoint to the controller. One developer notices that both endpoints perform the same bit of logic—say, constructing a URL given a set of parameters—and so moves that logic into a separate constructUrl() method within UserController.
  4. The team begins work on product-oriented pages. The developers create a second controller, ProductController, so as to not cram all of the methods into a single class.
  5. The developers recognize that the new controller might also need to use the constructUrl() method. At the same time, they realize hey! those two classes are controllers! and therefore must be naturally related. So they create an abstract BaseController class, move the constructUrl() into it, and add extends BaseController to the class definition of UserController and ProductController.
  6. This process repeats until BaseController has ten subclasses and 75 shared methods.

Now there are a ton of useful methods for the concrete controllers to use, simply by calling them directly. So what’s the problem?
The first problem is one of design. All of those different controllers are in fact unrelated to each other. They may live at the same layer of our stack, and may perform a similar technical role, but as far as our application is concerned, they serve different purposes. Yet we’ve now locked them to a fairly arbitrary object hierarchy.
The second is more practical. You’ll realize it the first time you need to use one of the 75 shared methods from somewhere other than a controller, and you find yourself instantiating a controller class to do so.
String url = new UserController().constructUrl(key, value);
You’ll have created a trove of useful methods which now require a controller instance to access. Your first thought might be something like, hey, I can just make the method static in the controller, and use it like so:
String url = UserController.constructUrl(key, value);
That’s not much better, and actually, a little worse. Even if you’re not instantiating the controller, you’ve still tied the controller to your other classes. What if you need to use the method in your DAO layer? Your DAO layer should know nothing about your controllers. Worse, in introducing a bunch of static methods, you’ve made testing and mocking much more difficult.
It’s important to emphasize the interaction flow here. In this example, a call is made directly to one of the concrete subclasses’ methods. Then, at some point, this method calls in to one or more of the utility methods in the abstract base class.
In fact, in this example there was never a need for an abstract base controller class. Each shared method should have either been moved to its appropriate service-layer classes (if it takes care of business logic) or to a utility classes (if it provides general, supplementary functionality). Of course, as mentioned above, the utility classes should still be instantiable, and not simply filled with static methods.
Now there is a set of utility methods that is truly reusable by any class that might need them. Furthermore, we can break those methods into related groups. The above diagram depicts a class called UrlUtility which might contain only methods related to creating and parsing URLs. We might also create a class with methods related to string manipulation, another with methods related to our application’s current authenticated user, etc.
Note also that this approach also fits nicely with the composition over inheritance principal.
Inheritance and abstract classes are a powerful construct. As such, numerous examples abound of its misuse, the Swiss Army Controller being a common example. In fact, I’ve found that most typical uses of abstract classes can be considered anti-patterns, and that there are few good uses of abstract classes.

The Template Method

With that said let’s then look at one of the best uses, described by the template method design pattern. I’ve found the template method pattern to be one of the lesser known–but more useful–of the design patterns out there.
You can read about how the patterns works in numerous places. It was originally described in the Gang of Four Design Patterns book; many descriptions can now be found online. Let’s see how it relates to abstract classes, and how it can be applied in the real world.
For consistency, I’ll describe another scenario that uses MVC controllers. In our example, we have an application for which there exist a few different types of users (for now, we’ll define two: employee and admin). When creating a new user of either type, there are minor differences depending on which type of user we are creating. For example, assigning roles needs to be handled differently. Other than that, the process is the same. Furthermore, while we don’t expect an explosion of new user types, we will from time to time be asked to support a new type of user.
In this case, we would want to start with an abstract base class for our controllers. Since the overall process of creating a new user is the same regardless of user type, we can define that process once in our base class. Any details that differ will be relegated to abstract methods that the concrete subclasses will implement:
public abstract class BaseUserController {

    // ... variables, other methods, etc

    @POST
    @Path("/user")
    public UserDto createUser(UserInfo userInfo) {
        UserDto u = userMapper.map(userInfo);
        u.setCreatedDate(Instant.now());
        u.setValidationCode(validationUtil.generatedCode());
        setRoles(u);  // to be implemented in our subclasses
        userDao.save(u);
        mailerUtil.sendInitialEmail(u);
        return u;
    }

    protected abstract void setRoles(UserDto u);

}
Then we need simply to extend BaseUserController once for each user type:
@Path("employee")
public class EmployeeUserController extends BaseUserController {

    protected void setRoles(UserDto u) {
        u.addRole(Role.employee);
    }

}
@Path("admin")
public class AdminUserController extends BaseUserController {

    protected void setRoles(UserDto u) {
        u.addRole(Role.admin);
        if (u.hasSuperUserAccess()) {
            u.addRole(Role.superUser);
        } 
    }

}
Any time we need to support a new user type, we simply create a new subclass of BaseUserController and implement the setRoles() method appropriately.
Let’s contrast the interaction here with the interaction we saw with the swiss army controller.
Using the template method approach, we see that the caller (in this case, the MVC framework itself–responding to a web request–is the caller) invokes a method in the abstract base class, rather than the concrete subclass. This is made clear in the fact that we have made the setRoles() method, which is implemented in the subclasses, protected. In other words, the bulk of the work is defined once, in the abstract base class. Only for the parts of that work that need to be specialized do we create a concrete implementation.

A Rule of Thumb

I like to boil software engineering patterns to simple rules of thumb. While every rule has its exceptions, I find that it’s helpful to be able to quickly gauge whether I’m moving in the right direction with a particular design.
It turns out that there’s good rule of thumb when considering the use of an abstract class. Ask yourself, Will callers of your classes be invoking methods that are implemented in your abstract base class, or methods implemented in your concrete subclasses?
  • If it’s the former–you are intending to expose only methods implemented in your abstract class–odds are that you’ve created a good, maintainable set of classes.
  • If it’s the latter–callers will invoke methods implemented in your subclasses, which in turn will call methods in the abstract class–there’s a good chance that an unmaintainable anti-patten is forming.

Using Vert.x to Connect the Browser to a Message Queue

Introduction

Like many of my software-engineering peers, my experience has been rooted in traditional Java web applications, leveraging Java EE or Spring stacks running in a web application container such as Tomcat or Jetty. While this model has served well for most projects I’ve been involved in, recent trends in technology–among them, microservices, reactive UIs and systems, and the so-called Internet of Things–have piqued my interest in alternative stacks and server technologies.

Happily, the Java world has kept up with these trends and offers a number of alternatives. One of these, the Vert.x project, captured my attention a few years ago. Plenty of other articles extol the features of Vert.x, which include its event loop and non-blocking APIs, verticles, event bus, etc. But above all of those, I’ve found in toying around with my own Vert.x projects that the framework is simply easy to use and fun.

So naturally I was excited when one of my co-workers and I recognized a business case that Vert.x was ideally suited for. Our company is a Java and Spring shop that is moving from a monolithic to a microservices architecture. Key to our new architecture is the use of an event log. Services publish their business operations to the event log, and other services consume them and process them as necessary. Since our company’s services are hosted on Amazon Web Services, we’re using Kinesis as our event log implementation.

Our UI team has expressed interest in being able to enable our web UIs to listen for Kinesis events and react to them. I’d recently created a POC that leveraged Vert.x’s web socket implementation, so I joined forces with a co-worker who focused on our Kinesis Java consumer. He spun up a Vert.x project and integrated the consumer code. I then integrated the consumers with Vert.x’s event bus, and created a simple HTML page that, via Javascript and web sockets, also integrated with the event bus. Between the two of us, we had within a couple of hours created an application rendered an HTML page, listened to Kafka, and pushed messages to be displayed in real-time in the browser window.

I’ll show you how we did it. Note that I’ve modified our implementation for the purposes of clarity in this article in the following ways:

  • This article uses RabbitMQ rather than Kinesis. The latter is proprietary to AWS, whereas RabbitMQ widely used and easy to spin up and develop prototypes against. While Kinesis is considered an event log and RabbitMQ a message queue, for our purposes their functionality is the same.
  • I’ve removed superfluous code, combined some classes, and abandoned some best practices (e.g. using constants or properties instead of hard-coded strings) to make the code samples easier to follow.

Other than that and the renaming of some classes and packages, the crux of the work remains the same.

The Task at Hand

First, let’s take a look at the overall architecture:


Figure 1

At the center of the server architecture is RabbitMQ. On the one side of RabbitMQ, we have some random service (represented in the diagram by the grey box labelled Some random service) that publishes messages. For our purposes, we don’t care what this service does, other than the fact that it publishes text messages. On the other side, we have our Vert.x service that consumes messages from RabbitMQ. Meanwhile, a user’s Web browser loads an HTML page served up by our Vert.x app, and then opens a web socket to register itself to receive events from Vert.x.

We care mostly what happens within the purple box, which represents the Vert.x service. In the center, you’ll notice the event bus. The event bus is the “nervous system” of any Vert.x application, and allows separate components within an application to communicate with each other. These components communicate via addresses, which are really just names. As shown in the diagram, we’ll use two addresses: service.ui-message and service.rabbit.

The components that communicate via the event bus can be any type of class, and can be written in one of many different languages (indeed, Vert.x supports mixing Java, Javascript, Ruby, Groovy, and Ceylon in a single application). Generally, however, these components are written as what Vert.x calls verticles, or isolated units of business logic that can be deployed in a controlled manner. Our application employs two verticles: RabbitListenerVerticle and RabbitMessageConverterVerticle. The former registers to consume events from RabbitMQ, passing any message it receives to the event bus at the service.rabbit address. The latter receives messages from the event bus at the service.rabbit address, transforms the messages, and publishes them to the service.ui-message address. Thus, RabbitListenerVerticle‘s sole purpose is to consume messages, while RabbitMessageConverterVerticle‘s purpose is to transform those messages; they do their jobs while communicating with each other–and the rest of the application–via the event bus.

Once the transformed message is pushed to the service.ui-message event bus address, Vert.x’s web socket implementation pushes it up to any web browsers that have subscribed with the service. And really… that’s it!

Let’s look at some code.

Maven Dependencies

We use Maven, and so added these dependencies to the project’s POM file:

<dependency>
  <groupId>io.vertx</groupId>
  <artifactId>vertx-core</artifactId>
  <version>3.3.3</version>
</dependency>
<dependency>
  <groupId>io.vertx</groupId>
  <artifactId>vertx-web</artifactId>
  <version>3.3.3</version>
</dependency>
<dependency>
  <groupId>io.vertx</groupId>
  <artifactId>vertx-web-templ-handlebars</artifactId>
  <version>3.3.3</version>
</dependency>
<dependency>
  <groupId>io.vertx</groupId>
  <artifactId>vertx-rabbitmq-client</artifactId>
  <version>3.3.3</version>
</dependency>

The first dependency, vertx-core, is required for all Vert.x applications. The next, vertx-web, provides functionality for handling HTTP requests. vertx-web-templ-handlebars augments enhances vertx-web with Handlebars template rendering. And vertx-rabbitmq-client provides us with our RabbitMQ consumer.

Setting Up the Web Server

Next, we need an entry point for our application.

package com.taubler.bridge;
import io.vertx.core.AbstractVerticle;

public class Main extends AbstractVerticle {

   @Override
   public void start() {
   }

}

When we run our application, we’ll tell Vert.x that this is the main class to launch (Vert.x requires the main class to be a verticle, so we simply extend AbstractVerticle). On startup, Vert.x will create an instance of this class and call its start() method.

Next we’ll want to create a web server that listens on a specified port. The Vert.x-web add-on uses two main classes for this: HttpServer is the actual web server implementation, while Router is a class that allows requests to be routed. We’ll create both in the start() method. Also, although we don’t strictly need one, we’ll use a templating engine. Vert.x-web offers a number of options; we’ll use Handlebars here.

Let’s see what we have so far:

   
TemplateHandler hbsHandler = TemplateHandler.create(HandlebarsTemplateEngine.create());

   @Override
   public void start() {

       HttpServer server = vertx.createHttpServer();
       Router router = new RouterImpl(vertx);
       router.get("/rsc/*").handler(ctx -> {
           String fn = ctx.request().path().substring(1);
           vertx.fileSystem().exists(fn, b -> {
               if (b.result()) {
                   ctx.response().sendFile(fn);
               } else {
                   System.out.println("Couldn’t find " + fn);
                   ctx.fail(404);
               }
           });
       });

       
       String hbsPath = ".+\.hbs";
       router.getWithRegex(hbsPath).handler(hbsHandler);

       router.get("/").handler(ctx -> {
           ctx.reroute(“/index.hbs”);
       });

       // web socket code will go here

       server.requestHandler(router::accept).listen(8080);

   }

Let’s start with, well, the start() method. Creating the server is a simple one-liner: vertx.createHttpServer()  vertx is an instance of io.vertx.core.Vertx, which is a class that is at the core of much of Vert.x’s functionality. Since our Main class extends AbstractVerticle, it inherits the member protected Vertx vertx.

Next, we’ll configure the server. Most of this work is done via a Router, which maps request paths to Handlers that process them and return the correct response. We first create an instance of RouterImpl, passing our vertx instance. This class provides a number of methods to route requests to their associated Handlers, which process the request and provide a response.

Since we’ll be serving up a number of static Javascript and CSS resources, we’ll create that handler first. The router.get(“/rsc/*”) call matches GET requests whose path starts with /rsc/ As part of Router’s fluent interface, it returns our router instance, allowing us to chain the handler() method to it. We pass that method an instance of io.vertx.core.Handler<io.vertx.ext.web.RoutingContext> in the form of a lambda expression. The lambda will look in the filesystem for the requested resource and, if found, return it, or else return a 404 status code.

Next we’ll create our second handler, to serve up dynamic HTML pages. To do this, we configure the router to route any paths that match the hbsPath regular expression, which essentially matches any paths ending in .hbs, to the io.vertx.ext.web.handler.TemplateHandler instance that we’d created as a class variable. Like our lambda above, this is an instance of Handler<RoutingContext>, but it’s written specifically to leverage a templating engine; in our case, a HandlebarsTemplateEngine. Although not strictly needed for this application, this allows us to generate dynamic HTML based on serverside data.

Last, we configure our router to internally redirect requests for / to /index.hbs, ensuring that our TemplateHandler handles them.

Now that our router is configured, we simply pass a reference to its accept() method to our server’s requestHandler() method, then (using HttpServer’s fluent API) invoke server’s listen() method, telling it to listen on port 8080. We now have a Web server listening on port 8080.

Adding Web Sockets

Next, let’s enable web sockets in our app. You’ll notice a comment in the code above; we’ll replace it with the following:

       SockJSHandlerOptions options = new SockJSHandlerOptions().setHeartbeatInterval(2000);
       SockJSHandler sockJSHandler = SockJSHandler.create(vertx, options);
       BridgeOptions bo = new BridgeOptions()
           .addInboundPermitted(new PermittedOptions().setAddress("/client.register"))
           .addOutboundPermitted(new PermittedOptions().setAddress("service.ui-message"));
       sockJSHandler.bridge(bo, event -> {
           System.out.println("A websocket event occurred: " + event.type() + "; " + event.getRawMessage());
           event.complete(true);
       });
       router.route("/client.register" + "/*").handler(sockJSHandler);

Our web client will use the SockJS Javascript library. Doing this makes integrating with Vert.x dirt simple, since Vert.x-web offers a SockJSHandler that does most of the work for you. The first couple of lines above creates one of those. We first create a SockJSHandlerOptions instance to set our preferences. In our case, we tell our implementation to expect a heartbeat from our web client every 2000 milliseconds; otherwise, Vert.x will close the web socket, assuming that the user has closed or navigated away from the web page. We pass our vertx instance along with our options to create a SockJSHandler, called sockJSHandler. Just like our lambda and hbsHandler above, SockJSHandler implements Handler<RoutingContext>

Next, we configure our bridge options. Here, the term “bridge” refers to the connection between our Vert.x server and the web browser. Messages are sent between the two on addresses, much like messages are passed on addresses along the event bus. Our BridgeOptions instance, then, configures on what addresses the browser can sent messages to the server (via the addInboundPermitted() method) and which the server can send to the browser (vai the addOutboundPermitted() method). In our case, we’re saying that the web browser can send messages to the server via the “/client-register” address, while the server can send messages to the browser on the “service.ui-message” address. We configure sockJSHandler’s bridge options by passing it our BridgeOptions instance, as well as a lambda representing a Handler<Event> that provides useful logging for us. Finally, we attach sockJSHandler to our router, listening for HTTP requests that match “/client.register/*”.

Consuming From the Message Queue

That covers the web server part. Let’s shift to our RabbitMQ consumer. First, we’ll write the code that creates our RabbitMQClient instance. This will be done in a RabbitClientFactory class:

public class RabbitClientFactory {

   public static RabbitClientFactory RABBIT_CLIENT_FACTORY_INSTANCE = new RabbitClientFactory();

   private static RabbitMQClient rabbitClient;
   private RabbitClientFactory() {}

   public RabbitMQClient getRabbitClient(Vertx vertx) {
       if (rabbitClient == null) {
           JsonObject config = new JsonObject();
            config.put("uri", "amqp://dbname:password@cat.rmq.cloudamqp.com/dbname");
            rabbitClient = RabbitMQClient.create(vertx, config);
       }
       return rabbitClient;
   }

}

This code should be pretty self explanatory. The one method, getRabbitClient(), creates an instance of a RabbitMQClient, configured with the AMQP URI, assigns it to a static rabbitClient variable, and returns it. As per the typical factory pattern, a singleton instance is also created.

Next, we’ll get an instance of the client and subscribe it to listen for messages. This will be done in a separate verticle:

public class RabbitListenerVerticle extends AbstractVerticle {

   private static final Logger log = LoggerFactory.getLogger(RabbitListenerVerticle.class);

   @Override
   public void start(Future<Void> fut) throws InterruptedException {

       try {
           RabbitMQClient rClient = RABBIT_CLIENT_FACTORY_INSTANCE.getRabbitClient(vertx);
           rClient.start(sRes -> {
               if (sRes.succeeded()) {
                   rClient.basicConsume("bunny.queue", "service.rabbit", bcRes -> {
                       if (bcRes.succeeded()) {
                           System.out.println("Message received: " + bcRes.result());
                       } else {
                           System.out.println("Message receipt failed: " + bcRes.cause());
                       }
                   });
               } else {
                   System.out.println("Connection failed: " + sRes.cause());
               }
           });

           log.info("RabbitListenerVerticle started");
           fut.complete();

       } catch (Throwable t) {
           log.error("failed to start RabbitListenerVerticle: " + t.getMessage(), t);
           fut.fail(t);
       }
   }
}

As with our Main verticle, we implement the start() method (accepting a Future with which we can report our success or failure with starting this verticle). We use the factory to create an instance of a RabbitMQClient, and start it using its start() method. This method takes a Handler<AsyncResult<Void>> instance which we provide as a lambda. If starting the client succeeds, we call its basicConsume() method to register it as a listener. We pass three arguments to that method. The first, “bunny.queue”, is the name of the RabbitMQ queue that we’ll be consuming from. The second, “service.rabbit”, is the name of the Vert.x event bus address to which any messages received by the client (which will be of type JsonObject) will be sent (see Figure 1 for a refresher on this concept). The last argument is again a Handler<AsyncResult<Void>>; this argument is required, but we don’t really need it, so we simply log success or failure messages.

So at this point, we have a listener that received messages from RabbitMQ and immediately sticks them on the event bus. What happens to the messages then?

Theoretically, we could allow those messages to be sent straight to the web browser to handle. However, I’ve found that it’s best to allow the server to format any data in a manner that’s most easily consumed by the browser. In our sample app, we really only care about printing the text contained within the RabbitMQ message. However, the messages themselves are complex objects. So we need a way to extract the text itself before sending it to the browser.

So, we’ll simply create another verticle to handle this:

public class RabbitMessageConverterVerticle extends AbstractVerticle {

   @Override
   public void start(Future<Void> fut) throws InterruptedException {
       vertx.eventBus().consumer("service.rabbit", msg -> {
           JsonObject m = (JsonObject) msg.body();
           if (m.containsKey("body")) {
               vertx.eventBus().publish("service.ui-message", m.getString("body"));
           }
       });
   }
}

There’s not much to it. Again we extend AbstractVerticle and override its start() method. There, we gain access to the event bus by calling vertx.eventBus(), and listen for messages by calling its consumer() method. The first argument indicates the address we’re listening to; in this case, it’s “service.rabbit”, the same address that our RabbitListenerVerticle publishes to. The second argument is a Handler<Message<Object>>. We provide that as a lambda that receives a Message<Object> instance from the event bus. Since we’re listening to the address that our RabbitListenerVerticle publishes to, we know that the Object contained as the Message’s body will be of type JsonObject. So we cast it as such, find its “body” key (not to be confused with the body of the Message<Object> we just received from the event bus), and publish that to the “service.ui-message” event bus channel.

Deploying the Message Queue Verticles

So we have two new verticles designed to get messages from RabbitMQ to the “service-ui.message” address. Now we need to ensure they are started. So we simply add the following code to our Main class:

   
protected void deployVerticles() {
       deployVerticle(RabbitListenerVerticle.class.getName());
       deployVerticle(RabbitMessageConverterVerticle.class.getName());
   }

   protected void deployVerticle(String className) {
       vertx.deployVerticle(className, res -> {
           if (res.succeeded()) {
               System.out.printf("Deployed %s verticle n", className);
           } else {
               System.out.printf("Error deploying %s verticle:%s n", className, res.cause());
           }
       });
   }

Deploying verticles is done by calling deployVerticle() on our Vertx instance. We provide the name of the class, as well as a Handler<AsyncResult<String>>. We create a deployVerticle() method to encapsulate this, and call it to deploy each of RabbitListenerVerticle and RabbitMessageConverterVerticle from within a deployVerticles() method.

Then we add deployVerticles() to Main’s start() method.

HTML and Javascript

Our serverside implementation is done. Now we just need to create our web client. First, we create a basic HTML page, index.bhs, and add it to a templates/ folder within our web root:

<html>
<head>
 <title>Messages</title>
 <link rel="stylesheet" href="/rsc/css/style.css'>
  <script src="https://code.jquery.com/jquery-3.1.0.min.js" integrity="sha256-cCueBR6CsyA4/9szpPfrX3s49M9vUU5BgtiJj06wt/s=" crossorigin=”anonymous”></script>
  
  <script src="https://cdn.jsdelivr.net/sockjs/0.3.4/sockjs.min.js"></script>
  
  <script src="/rsc/js/vertx-eventbus.js"></script>
  
  <script type="text/javascript” src=”/rsc/js/main.js"></script>
</head>

<body>
 <h1>Messages</h1>
 <div id="messages"></div>
</body>
</html>

We’ll leverage the jQuery and sockjs Javascript libraries, so those scripts are imported. We’ll also import three scripts that we’ve placed in a rsc/js/ folder: main.js and websocket.js, which we’ve created, and vertx-eventbus.js, which we’ve downloaded from the Vert.x site. The other important element is a DIV of id messages. This is where the RabbitMQ messages will be displayed.

Let’s look at our main.js file:

var eventBus = null;

var eventBusOpen = false;

function initWs() {
   eventBus = new EventBus(‘/client.register’);
   eventBus.onopen = function () {
     eventBusOpen = true;
     regForMessages();
   };
   eventBus.onerror = function(err) {
     eventBusOpen = false;
   };
}

function regForMessages() {
   if (eventBusOpen) {
      eventBus.registerHandler('service.ui-message', function (error, message) {
           if (message) {
             console.info('Found message: ' + message);
             var msgList = $("div#messages");
             msgList.html(msgList.html() + "<div>" + message.body + "</div>");
           } else if (error) {
console.error(error);
           }        
       });
   } else {
       console.error("Cannot register for messages; event bus is not open");
   }
}

$( document ).ready(function() {
  initWs();
});

function unregister() {
  reg().subscribe(null);
}

initWs() will be called when the document loads, thanks to jQuery’s document.ready() function. It will open a web socket connection on the /client.register channel (permission for which, as you recall, was explicitly granted by our BridgeOptions class).

Once it successfully opens, regForMessages()is invoked. This function invokes the Javascript representation of the Vert.x event bus, registering to listen on the “service.ui-message” address. Vert.x’s sockjs implementation provides the glue between the web socket address and its event bus address. regForMessages()also takes a callback function that accepts a messages, or an error if something went wrong. As with Vert.x event bus messages, each message received will contain a body, which in our case consists of the text to display. Our callback simply extracts the body and appends it to the messages DIV in our document.

Running the Whole Application

That’s it! Now we just need to run our app. First, of course, we need a RabbitMQ instance. You can either download a copy (https://www.rabbitmq.com/download.html) and run it locally, or use a cloud-provider such as Heroku (https://elements.heroku.com/addons/cloudamqp)  Either way, be sure to create a queue called bunny.queue.

Finally, we’ll launch our Vert.x application. Since Vert.x does not require an app server, it’s easy to start up as a regular Java application. The easiest way is to just run it straight within your IDE. Since I use Eclipse, I’ll provide those steps:

  1. Go to the Run -> Run Configurations menu item
  2. Click the New Run Configurations button near the top left of the dialog
  3. In the right-hand panel, give the run configuration a name such as MSGQ UI Bridge
  4. In the Main tab, ensure that the project is set to the one in which you’d created the project
  5. Also in the Main tab, enter io.vertx.core.Launcher as the Main class.
  6. Switch to the arguments tab and add the following as the Program arguments: run com.taubler.bridge.Main –launcher-class=io.vertx.core.Launcher
  7. If you’re using a cloud provider such as Heroku, you might need to provide a system property representing your Rabbit MQ credentials. Do this in the Environment tab.

Once that’s set up, launch the run configuration. The server is listening on port 8080, so pointing a browser to http://localhost:8080 will load the index page:

blog-message-1.png

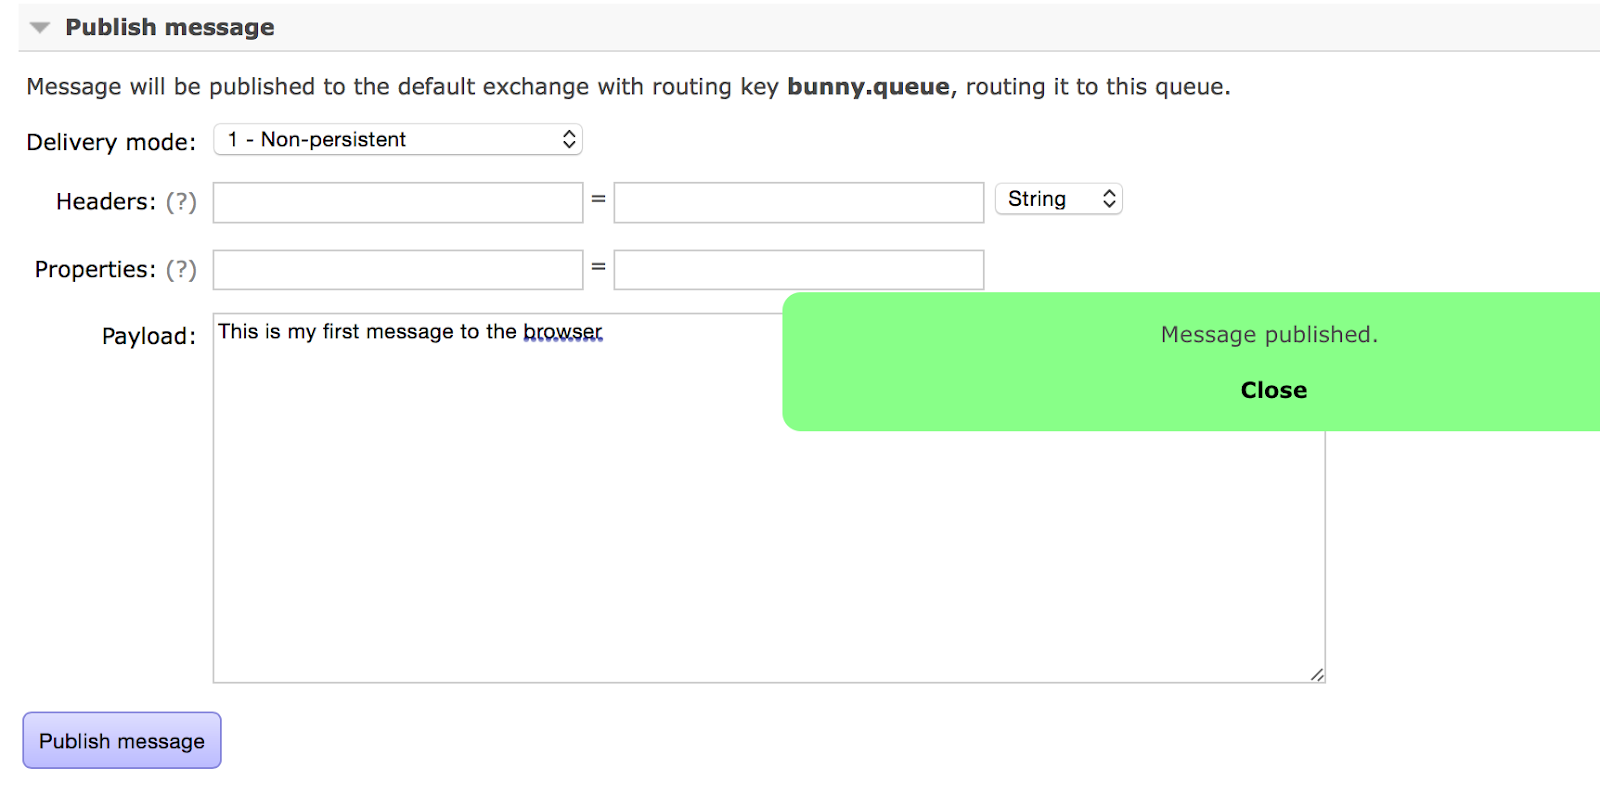
Next, go to the RabbitMQ management console’s Queues tab. Under the Publish message header, you’ll find controls allowing you to push a sample message to the queue:

blog-rabbit-1.png

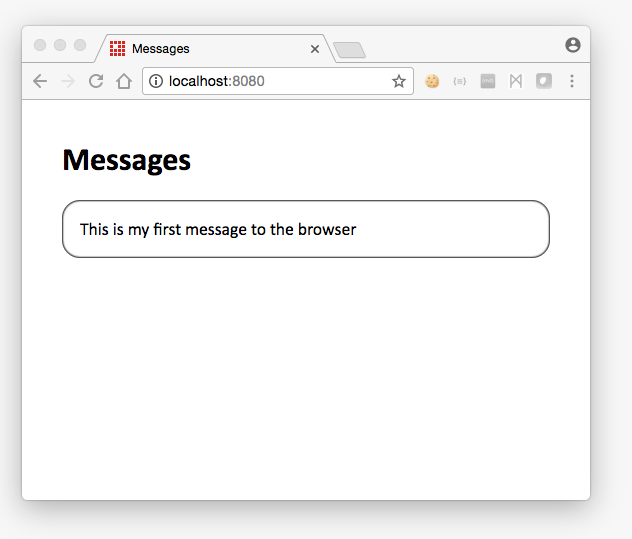
Once you’ve one that, head back to the browser window. Your message will be there waiting for you!

blog-message-2.png

That’s it!

I hope this post has both taught you how to work with message queues and web sockets using Vert.x, and demonstrated how easy and fun working with Vert.x can be.

Business Logic for Scala/Play apps

As I’d mentioned previously, I’m a fairly seasoned Java developer who is making a foray into Scala and its ecosystem (including the Play framework, as well as Akka).

One thing that’s struck me about Play is that there doesn’t seem to be a prescribed pattern for how to handle business logic. This is in contrast to a typical Java EE application (or Spring-based Java web application). With the latter, you’d typically find applications divided into the following:

  • MVC Layer (or Presentation Layer) – This layer would typically contain:
    • UI Models: POJOs designed to transfer values from the controllers to the UI templates
    • Views: files containing markup mixed with UI models, to present data to the user. These would typically by JSPs, or files of some other tempting language such as Thymeleaf, Handlebars, Velocity, etc. They might also be JSON or XML responses in the case of single-page applications
    • Controllers: Classes designed to map requests to business logic classes, and transforming the results into UI Models.
  • Business Layer – This layer would typically contain:
    • Managers and/or Facades: somewhat coarse-grained classes that encapsulate business logic for a given domain; for example, UserFacade, AccountFacade, etc. These classes are typically stateless singletons.
    • Potentially Business Models: POJOs that describe entities from the business’ standpoint.
  • Data Access Layer – This layer would typically contain:
    • DAOs (Data Access Objects): Fine-grained, singleton classes that encapsulate the logic needed to for CRUD operations on database entities
    • Database Entities: POJOs that map to database tables (or Mongo collections, etc, depending on the data source).
By contrast, Play applications seem to typically have only the MVC Layer. Occasionally I’ll see examples with a utils/ folder, but I’ve yet to see any examples with what I would consider an entirely separate business layer or data access layer.
Clearly I could Business and Data Access Layers for my Play application if I wanted to. But part of learning a new framework is not just learning the mechanics, but also the spirit of the framework. So here are a few thoughts I’ve had on the subject:

Rely on Models’ Companion Objects

Scala has the concept of companion objects. A companion object is essentially a singleton instance of a class. For example, I might have a model called User, which looks something like this:
case class User(id: Long, firstName: String, lastName: String email: String)
I would typically create, in the same User.scala file, a companion object like so:
object User {
  def findByEmail(email: String): User = {
    // query the database and return a User
  }
}

As shown above, it’s common for companion objects to contain CRUD operations. So one thought is that we can combine business logic and data access methods in a model’s companion object, treating the companion object as a sort of hybrid manager/DAO.

There are of course a few downsides to this approach. First is that of separation of concerns. If we’re imbuing companion objects with the ability to perform CRUD operations and business logic, then we’ll wind up with large, hard to read companion objects that have multiple responsibilities.

The other downside is that business operations within a companion object would be too fine-grained. Often, business logic spans multiple entities. Trying to choose which entity’s companion object should contain a specific business rule can become cumbersome. For example, say I want to update a phone number. Surely, that functionality belongs in a PhoneNumber object. But… what if my business stipulates that a phone number can only contain an area code that corresponds to its owner’s mailing address? Suddenly, my PhoneNumber object must communicate with a User and MailingAddress object.

Use Middleware for Business Logic

As a Java engineer, I’m using to my business logic being encapsulated within stateless Spring beans. These beans exist in the Spring container (i.e. application context). They are injected into, for example, controllers, who in turn invoke methods on the bean to cause some business operation to concern.

Play ships with Akka our of the box. So I wonder… would a framework like Akka suffice? Presumably I can create an actor hierarchy for each business operation, thus keeping the operations centralized and well-defined. I’m just delving into Akka, so I’m not sure how viable of a solution that would be. My sense is that, at best, I’d be misusing Akka somewhat with this approach. Moreover, I suspect I’m trying to shoehorn a Spring-application paradigm into a Play application.

Let Aggregate Roots Define Business Logic

I’ve coincidentally been reading a lot Martin Fowler‘s blog posts. One idea of his that seems to be picking up traction is that anemic entities–those who are little more than getters and setters–are an anti-pattern. Couple this with the concept of aggregates and aggregate roots presented in Eric Evans’ Domain Driven Design, and I think I might be on the best solution.

The basic premise is that, unlike the layered architecture I described above, with Manager/Facade classes, the domain entities themselves should perform their own business logic. Furthermore, entities should be arranged into aggregates. An aggregate is essentially a group of domain entities that logically form one unit. Furthermore, one of these entities should be the root, to which all other entities are attached. Modifications should only be done through that root.

In my example above about Users, PhoneNumbers and MailingAddresses, those entities would be arranged as an aggregate. User would be the root entity; after all, PhoneNumbers and MailingAddresses don’t simply exist on their own, but rather are associated with a person (or organization). To modify a User’s phone number, I would go through the User rather than directly modifying the PhoneNumber. For example, something like this:

var user: User = Users.findById(123)
user.phoneNumber = “415-555-1212”

rather than this:

var pn: PhoneNumber = PhoneNumbers.findById(789)
ph.value = “415-555-1212

Using the former approach, my User instance can ensure data integrity; e.g. ensuring that the provided area code is valid.

This, then, may be the best option:

  1. Companion objects handle CRUD data access operations
  2. Entities themselves–organized into aggregates–handle their own business rules
  3. No separate business logic stereotype is called out

Scaling Scala – part 1

It’s time to explore Scala. I still enjoy Java programming, and that’s still what I do for a living. But I have to admit that Scala is intriguing. Plus, it’s good to learn new languages every so often. And as they say, Java is more than a language; it’s also a platform and an ecosystem, one that Scala fits very well into.

I’ve gone through different books and tutorials, but the best way to learn a language is to come up with a task and figure out how to do it. I’ve decided that while I’m learning Scala, I’ll also learn the Play! framework. My task will be a microservice whose purpose is to authenticate users. Although my current employer doesn’t use Scala (at least not directly, although we do use Kafka, Akka, and other technologies written in Scala) my plan is to write a service that could be used by the company. That way I won’t be tempted to cut corners.

As I develop this project, I’ll post the solutions to any issues I encounter along the way. I figure there are probably enough Scala noobs out there who might encounter the same problems. I also figure that some of these issues might be very elementary to developers who are more experienced with Play! and Scala. In that vein, any corrections or suggestions are most welcome!

Maven Repositories (and the Oracle driver)

I started a few days ago, and hit two issues rather quickly. The first stems from my company’s use of Oracle as its RDBMS; that’s where we store user credentials. So of course I would need to read from Oracle in order to authenticate users.

As I understand it, Play! makes use of SBT (the Simple Build Tool), which is developed by Typesafe, and is used to manage Play! projects (and other Scala-based frameworks). SBT is analogous to Maven for pure Java projects. In fact, SBT makes use of Ivy for dependency management; Ivy, in turn, makes use of Maven repositories.

So I figured I’d need to pull the Oracle JDBC driver from Maven Central. Play! projects are created with a build.sbt file in the project’s root directory, and that’s where dependencies are listed. We use ojdbc6 (the Oracle JDBC driver for Java 6), so our POM entry looks like this:

<dependency>
    <groupId>com.oracle</groupId>
    <artifactId>ojdbc6</artifactId>
    <version>11.2.0.3</version>
</dependency>

To add that to build.sbt, it would look like this:

libraryDependencies += "com.oracle" %% "ojdbc6" % "11.2.0.3"

I added that to build.sbt, and was confronted with errors stating that that dependency couldn’t be resolved. Turns out that due to licensing reasons, Oracle does not allow its JDBC driver in any public repos. So the solution is to simply download the JAR file from Oracle, create a lib/ directory in the Play! project’s root, and add the JAR there.

Admittedly, that was as much an issue of the ojdbc6 driver than with Play! itself, but I thought it worth documenting here.

Artifactory (or Nexus, if you prefer)

Next up was the issue of artifacts that my company produces. Much of our code is encapsulated in common JAR files and, of course, hosted in our own internal (Artifactory) repository. Specifically, the domain class that I would be pulling from the database contains, among other fields, and enum called Type (yes, I know… that name was not my doing!) which was located in a commons module. I could’ve created a Scala Enumeration for my project, or just skipped the field, but I wanted to demonstrate the interoperability between new Scala projects and our existing Java code.

So I’d have to point SBT to the correct location to find the commons module. I found bits and pieces online on how to do it; here’s the solution that I ultimately pieced together:

(1) SBT had already create a ~/.sbt/0.13/ directory for me. In there, I created a plugins/ subdirectory and with there a credentials.sbt file with these contents:

credentials += Credentials(Path.userHome / “.ivy2” / “.credentials”)

(2) Within the existing ~/.ivy2/ directory, created a .credentials file with these contents:

realm=[Artifactory Realm]
host=company.domain.com
user=[username]
password=[password]

(3) Add the repository location in ~/.sbt.repositories like so:

my-maven-proxy-releases: https://artifactory.tlcinternal.com/artifactory/LC_CENTRAL

(4) Added the following line in ~/.sbtconfig to tell SBT where to find the credentials:

export SBT_CREDENTIALS=”$HOME/.ivy2/.credentials”

I’m not sure why we need both step 1 and 4, but both seem to be required.

Once I restarted my Play! application (this was one case where hot-deployment didn’t seem to work) I was able to use the commons module in my Play! app.

Spring Data, Mongo, and Lazy Mappers

In a previous post, I mentioned two things that every developer should do when using Spring Data to access a MongoDB datastore. Specifically, you should be sure to annotate all of your persistent entities with @Document(collection=”<custom-collection-name>”) and @TypeAlias(“<custom-type>”). This decouples your Mongo document data from your specific Java class names (which Spring Data will otherwise closely couple by default) making things like refactoring possible.

With my particular application, however, I ran into an additional problem. Let me recap. My application is a drawing application of sorts. Drawings are are modeled by, well, a Drawing class. A Drawing can contain multiple instances of Page, and within each Page, multiple Shape objects. Shape, in turn, is an abstract class, containing a number of subclasses (Circle, Star, Rectangle, etc).

For our purposes, let’s focus on the relationship between a Page and its Shapes. Here’s a snippet from the Page class:

@Document(collection=”page”)
@TypeAlias(“myapp.page”)
public class Page extends BaseDocument {

    @Id 
    private String id;

    @Indexed
    private String drawingId;

    private List<Shape> shapes = new ArrayList<Shape>();

    // ….


}

First not that I’ve annotated this class so that I have control over the name of the collection that stores Page documents (in this case, “page”), and so that Spring Data will store an alias to the Page class (in this case, “my app.page”) along with the persisted Page documents, rather than storing the fully-qualified class name.

Also of importance here is that the Page class knows nothing about any specific Shape subclasses. This is important from an OO perspective, of course; I should be able to add any number of Shapes to my app’s ecosystem, and the Page class should continue to work with no modifications.

Now let’s look at my Shape class:

public abstract class Shape extends BaseDocument {


    @Id
    private String id;


    @Indexed
    private String pageId;


    // attributes
    private int x;

    private int y;

    // …

}

Nothing surprising here. Note that Shape has none of the SpringData annotation; that’s because no concrete instance of Shape will be persisted along with any Pages. It is abstract, after all. Instead, a Page will contain instances of Shape subclasses. Let’s take a look at one such subclass:

@Document(collection=”shape”)
@TypeAlias(“myapp.shape.star”)

public class Star extends Shape {

    private int numPoints;
    private float innerRadius;

    private float outerRadius;

}

The @Document(collection=”shape”) annotation is currently unused, because per my app design, any Shape subclass instance will always be stored as a nested collection within a Page. But it would certainly be possible to store different shapes directly into a specific collection.

The @TypeAlias annotation, however, is very important. The purpose of that one is to tell Spring Data how to map the different Shapes that it finds within a Page back into the appropriate class. After all, if a Page containing a nine-point star is persisted, then when it’s read back in, that star had better be mapped back into a Star class, not a simple Shape class. After all, Shape itself knows nothing about number of points!

Feeling pretty happy with myself, I tried out my code. Upon trying to read my drawings back in, I began getting errors of this type:

org.springframework.data.mapping.model.MappingInstantiationException: Could not instantiate bean class [com.myapp.documents.Shape]: Is it an abstract class?; nested exception is java.lang.InstantiationException

Indeed, Shape is an abstract class, and so indeed, it cannot be directly instantiated. But why was Spring Data trying to directly instantiate a Shape? I played around, tweaked a few things, but nothing fundamentally changed. I checked StackOverflow and the Spring forums. Nothing. So it was time to dig into the documentation.

As with most typical Spring Data/Mongo apps, mine was configured to use a bean of type org.springframework.data.mongodb.core.convert.DefaultMongoTypeMapper to map persistence documents to and from Java classes:

     <bean id=”mongoTypeMapper” class=”org.springframework.data.mongodb.core.convert.DefaultMongoTypeMapper“>
        <constructor-arg name=“typeKey” value=“_alias”></constructor-arg>

    </bean>

    <bean id=”mappingMongoConverter”
class=”org.springframework.data.mongodb.core.convert.MappingMongoConverter”>
        <constructor-arg ref=“mongoDbFactory” />
        <constructor-arg ref=“mappingContext” />
        <property name=“typeMapper” ref=mongoTypeMapper/>
    </bean>

    <bean id=”mongoTemplate” class=”org.springframework.data.mongodb.core.MongoTemplate”>
        <constructor-arg ref=“mongoDbFactory” />
        <constructor-arg ref=“mappingMongoConverter” />

    </bean>

The docs indicated that DefaultMongoTypeMapper was responsible for reading and writing the type information stored with persistent data. By default, this would be a _class property pointing to com.myapp.documents.Star; with my customizations it became an _alias property pointing to may app.shape.star. But if DefaultMongoTypeMapper wouldn’t do the trick, perhaps I needed another mapper.

Looking through the documentation, I found org.springframework.data.convert.MappingContextTypeInformationMapper. Here’s what its Javadocs indicated:

TypeInformationMapper implementation that can be either set up using a MappingContext or manually set up Map of String aliases to types. If a MappingContext is used the Map will be build inspecting the PersistentEntity instances for type alias information.

That seemed promising. If I could replace my DefaultMongoTypeMapper with a MappingContextTypeInformationMapper that could scan my persistent entities and build a type-to-alias mapping, then that should solve my problem. The docs also said something about manually creating a Map, but a) It wasn’t readily apparent how to create a Map myself, and b) I didn’t like that approach; I didn’t want to have to manually configure an entry for any new Shape that might be created.

One problem. You’ll notice above that my DefaultMongoTypeMapper is wired into my MappingMongoConverter by way of the latter’s typeMapper property. In fact, typeMapper is itself of type MongoTypeMapper. While DefaultMongoTypeMapper implements MongoTypeMapper,  MappingMongoConverter does not. Fortunately, DefaultMongoTypeMapper allows you to chain together fallback mappers by way of an internal property, mappers, which itself is a List<? extends TypeInformationMapper>. And as luck would have it, MappingMongoConverter implements TypeInformationMapper.

So I would keep my DefaultMongoTypeMapper, and add a MappingMongoConverter to its mappers list. I modified my spring XML config like so:

  <bean id=”mongoTypeMapper” class=”org.springframework.data.mongodb.core.convert.DefaultMongoTypeMapper”>
<constructor-arg name=”typeKey” value=”_alias”></constructor-arg>
    <constructor-arg name=”mappers“>
        <list>
            <ref bean=mappingContextTypeMapper />
        </list>
    </constructor-arg> 
</bean>

  <bean id=”mappingContextTypeMapper” class=”org.springframework.data.convert.MappingContextTypeInformationMapper“>
      <constructor-arg ref=”mappingContext” />

  </bean>

I redeployed and ran my app.

And I ran into the same exact error. Damn.

At this point, I became concerned that maybe all of the TypeAlias information was completely ignored by SpringData with nested documents, such as my Shapes nested within Pages. So I decided to roll up my sleeves, fire up my debugger, and start getting intimate with the Spring Data source code.

After a bit of debugging, I learned that Spring Data was indeed attempting to determine if any TypeAlias information applied to the Shapes that were being read in for any Page. But in a lazy, half-hearted way.

When I say lazy, I mean that there was absolutely no scanning of entities to search for @TypeAlias annotation like I’d assumed there would be. Everything was done at runtime, as new data types were discovered. The MappingMongoConverter would read my base entity; i.e. a Page document. It would then discover that this document had a collection of things called shapes. Then it would examine the Page class to find the shapes property, and discover that shapes was of type List<Shape>. And finally it would examine the Shape class to determine if it had any TypeAlias data that it could cache for later.

In other words, it was completely backwards from what I needed. This mapper wouldn’t work for me, either.

By this time, I’d developed enough understanding as to what was going on, that creating my own mapper didn’t seem too tough. And that’s what I did. Really, all I needed was a mapper that I could configure to scan one or more packages to discover persistent entities with TypeAlias information, and cache that information for later use.

My class was called EntityScanningTypeInformationMapper, and its full source code is a the end of this post. But the relevant parts are:

  • Its constructor takes a List<String> of packages to scan.
  • It has an init() method that scans the provided packages
  • Scanning a package entails using reflection to read in the information for each class in the package, determining if it is annotated with @TypeAlias, and if so, mapping the alias to the class.

My Spring XML config was modified thusly:

  <bean id=”mongoTypeMapper” class=”org.springframework.data.mongodb.core.convert.DefaultMongoTypeMapper”>
<constructor-arg name=”typeKey” value=”_alias”></constructor-arg>
    <constructor-arg name=”mappers”>
        <list>
            <ref bean=”entityScanningTypeMapper” />
        </list>
    </constructor-arg> 
</bean>

  <bean id=”entityScanningTypeMapper” class=”com.myapp.utils.EntityScanningTypeInformationMapper” init-method=”init”>
    <constructor-arg name=”scanPackages”>
        <list>
            <value>com.myapp.documents.shapes</value>
        </list>
    </constructor-arg> 

  </bean>

I redeployed and retested, and it ran like a champ.

So my lesson is that Spring Data, out of the box, doesn’t seem to work well with polymorphism, which is a shame given the schema-less nature of NoSQL data stores like MongoDB. But it doesn’t take too much effort to write your own mapper to compensate.

Oh, and here’s the EntityScanningTypeInformationMapper source:

public class EntityScanningTypeInformationMapper implements TypeInformationMapper {
    private Logger log = Logger.getLogger(this.getClass());
    private final List<String> scanPackages;
    private Map<String, Class<? extends Object>> aliasToClass;
    public EntityScanningTypeInformationMapper(List<String> scanPackages) {
        this.scanPackages = scanPackages;
    }
    public void init() {
       this.scan(scanPackages);
    }
    private void scan(List<String> scanPackages) {
        aliasToClass = new HashMap<>();
        for (String pkg : scanPackages) {
            try {
                findMyTypes(pkg);
            } catch (ClassNotFoundException | IOException e) {
                log.error(“Error scanning package “ + pkg, e);
            }
        }
    }
    private void findMyTypes(String basePackage) throws ClassNotFoundException, IOException {
        ResourcePatternResolver resourcePatternResolver = new PathMatchingResourcePatternResolver();
        MetadataReaderFactory metadataReaderFactory = new CachingMetadataReaderFactory(resourcePatternResolver);
        String packageSearchPath = ResourcePatternResolver.CLASSPATH_ALL_URL_PREFIX +
                                   resolveBasePackage(basePackage) + “/” + “**/*.class”;
        Resource[] resources = resourcePatternResolver.getResources(packageSearchPath);
        for (Resource resource : resources) {
            if (resource.isReadable()) {
                MetadataReader metadataReader = metadataReaderFactory.getMetadataReader(resource);
                Class<? extends Object> c = Class.forName(metadataReader.getClassMetadata().getClassName());
                log.debug(“Scanning package “ + basePackage + ” and found class “ + c);
                if (c.isAnnotationPresent(TypeAlias.class)) {
                    TypeAlias typeAliasAnnot = c.getAnnotation(TypeAlias.class);
                    String alias = typeAliasAnnot.value();
                    log.debug(“And it has a TypeAlias “ + alias);
                    aliasToClass.put(alias, c);
                }
            }
        }
    }
    private String resolveBasePackage(String basePackage) {
        return ClassUtils.convertClassNameToResourcePath(SystemPropertyUtils.resolvePlaceholders(basePackage));
    }
    @Override
    public TypeInformation<?> resolveTypeFrom(Object alias) {
        if (aliasToClass == null) {
            scan(scanPackages);
        }
        if (alias instanceof String) {
            Class<? extends Object> clazz = aliasToClass.get( (String)alias );
            if (clazz != null) {
                return ClassTypeInformation.from(clazz);
            }
        }
        return null;
    }
    @Override
    public Object createAliasFor(TypeInformation<?> type) {
        log.debug(“EntityScanningTypeInformationMapper asked to create alias for type: “ + type);
        return null;
    }


}

Before You Use SpringData and MongoDB

The Upfront Summary

For those who don’t have time to read a long blog post, here’s the gist of this article: always always always annotate your persisted SpringData entity classes with @Document(collection=”<custom-collection-name>”) and @TypeAlias(“<custom-type>”) . This should be an unbreakable rule. Otherwise you’ll be opening yourself up to a world of hurt later.

SpringData is Easy to Get Started With

Like many Java developers, I rely on the Spring Framework. Everything, from my data access layer to my MVC controllers are managed within a Spring application context. So when I decided to add MongoDB to the mix, it was without a second thought that I decided to use SpringData to interact with Mongo.

That was months ago, and I’ve run into a few problems. As it turns out, these particular problems were easy to solve, but it took awhile to recognize what was going on and come up with a solution. Surprisingly little information existed on StackOverflow or the Spring forums for what I’m imagining is a common problem.

Let me explain.

My Data Model

My application is basically an editor. Think of a drawing program, where users can edit a multi-page “drawing” document. Within a drawing’s page, users can create and manipulate different shapes. As a document store, MongoDB is well-suited for persisting this sort of data. Roughly speaking, my data model was something like this (excuse the lack of UML):

  • Drawings are the top-level container
  • A Drawing has one or more Pages
  • A Page consists of many Shapes.
  • Shape is an abstract class. It has some properties shared by all Shape subclasses, such as size, border with and color, background color, etc
  • Concrete subclasses of Shape can contain additional properties. For example, Star has number of points, inner radius, outer radius, etc

Drawing are stored separately then pages; i.e. they are not nested. Shapes, however, are nested within Pages. For example, here’s a snippet from the Drawing class:

public class Drawing extends BaseDocument {

    @Id 
    private String id;

    // ….


}

and the Page class:

public class Page extends BaseDocument {

    @Id 
    private String id;

    @Indexed
    private String drawingId;

    private List<Shape> shapes = new ArrayList<Shape>();

    // ….


}

So in other words, when a user goes to edit a given drawing, we simply retrieve all of the Pages whose drawingId matches the ID of the drawing being edited.

Don’t Accept SpringData’s Defaults!

SpringData offers you the ability to customize how your entities are persisted in your datastore. But if you don’t explicitly customize, SpringData will make do as best as it can. While that might seem helpful up front, I’ve found the opposite. SpringData’s default behavior will invariably paint you into a corner that’s difficult to get out of. I’d argue that, rather than guessing, SpringData should throw a runtime exception at startup. Short of that, every tutorial about SpringData/MongoDB should strongly encourage developers of production applications to tell Spring how to persist their data.

The first default is how SpringData maps classes to collections. Collections are how many NoSQL data stores, MongoDB included, store groups of related data. Although it’s not always appropriate to compare NoSQL databases to traditional RDBMs, you can roughly think of a collection the same way you think of a table in a SQL database.

Chapter 7 of the SpringData/Mongo docs explains how, by default classes are mapped to collections:

The short Java class name is mapped to the collection name in the following manner. The class ‘com.bigbank.SavingsAccount‘ maps to ‘savingsAccount‘ collection name.

So based on my data model, I knew I’d find a drawing collection and a page collection in my MongoDB instance.

Now, I’ve used ORMs like Hibernate extensively. Probably for that reason, I wasn’t content to let my Mongo collections be named for me. So I looked for a way to specify my collection names.

The answer was simple enough. Although not a strict requirement, persisted entities should be annotated with the @org.springframework.data.mongodb.core.mapping.Document annotation. Furthermore, that annotation takes a collection argument in which you can pass your desired collection name.

So my Drawing class became annotated with @Document(collection=”drawing”), and my Page class became annotated with @Document(collection=”page”). The end result would be the same–a drawing and a page collection in Mongo–but I now had control. I specified the collection name simply because it made me feel more comfortable, but it turns out there’s an important, tangible reason to do so (more on that later).

With everything in place, I started testing my app. I created a few drawings, added some pages and shapes, and saved them all to MongoDB. Then I used the mongo command-line tool to examine my data. One thing immediately stuck out. Every document stored in there had a _class property which pointed to the fully-qualified name of the mapped class. For example, each Page document contained the property “_class” : “com.myapp.documents.Page”.

The purpose of that value, as you might guess, is to instruct Spring Data how to map the document back to a class when reading data out. This convention struck me as a little concerning. After all, my application might be pure Java at this point, but my data store should be treated as language-agnostic. Why would I want Java-specific metadata associated with my data?

After thinking about it, I shook off my concern. Sure, the _class property would be there on every record, but if I started using another platform to access the data, then the property could just be ignored. Practically speaking, what could actually go wrong?

What Could Go Wrong

Then one day I decided to refactor my entire application. I’d been organizing my code based on architectural layer, and I decided instead to try organizing it by feature instead. Eclipse of course allowed me to do this in a matter of minutes. So I WARred up my changes, deployed them to Tomcat, and viola! I could no longer read in any of my drawing/page/shape data.

It quickly became clear what the problem was. My data contained _class information that pointed to a now-non-existence fully-qualified class name. Shape was no longer in the com.myapp.documents package.

With the problem identified, what was the solution?

Making it Right

As mentioned above, SpringData offers the @TypeAlias annotation. Annotating a document as such and providing a value tells Spring to store that value, rather than the fully-qualified classname, as the document’s _class parameter.

So here’s what I did:

@Document(collection=”page”)
@TypeAlias(“myapp.page”)
public class Page extends BaseDocument {
    // …
}

Of course, I still couldn’t read any of my existing data in, but moving forward, any new data would be refactor-proof. Fortunately my app was nowhere near production-ready at this point, so deleting all of my old drawings and starting with new ones was no problem. If that wasn’t an option, then I figure I’d have two options:

  1. Change the @TypeAlias value to match the old, fully-qualified class name, rather than the generic myapp.page value. Of course I’d be stuck with a confusing, language-specific value at that point.
  2. Go through each of the affected collections in my MongoDB store and update their _class values to the new, generic aliases. Certainly possible, although a bit scary for my taste as a MongoDB newbie.

One additional improvement could be made at this point. The property in the MongoDB documents is still called _class, but now that’s a bit of a misnomer. I’d prefer something like, well, _alias. This is easy to change. Somewhere in your XML or Java config, you’ve probably specified a DefaultMongoTypeMapper. Simply pass a new typeKey value in the constructor. For example, here’s a snippet from my XML config:

  <bean id=”mongoTypeMapper” class=”org.springframework.data.mongodb.core.convert.DefaultMongoTypeMapper”>
<constructor-arg name=”typeKey” value=”_alias”></constructor-arg>

</bean>

Are We All Set?

It turns out that I immediately ran into another problem. This one is a bit more specific to my particular application, so I’ll describe it in my next article.

Eclipse Run Configurations and VM Arguments

One of the great things about an IDE like Eclipse is how easy it is to run your application on the fly, as you’re developing it. Eclipse uses the concept of a Run Configuration for this. Run configurations define your code’s entry point (i.e. the project and Main class), as well as numerous other aspects of the run, including the JRE to use, the classpath, and various arguments and variables for your application’s use.

If you’re a developer who uses Eclipse, chances are you’ve created your own Run Configuration. It’s simple. Just go to the Run > Run Configurations… menu item. In the dialog that appears, click the New icon at the top left, and create your new configuration.

You can then use the six or so tabs to the right to configure your runtime environment. One of the options you can configure, within the Arguments tab, is the VM arguments to be be passed to your application. For example, one of my web applications can be run in different environments; certain settings will change depending on whether I’m running in development, staging, or production mode. So I pass a -Dcom.taubler.env=x argument when I launch my application (where x might equals dev, stage, or prod). When I run my application in Tomcat, I simply add the argument to my startup script. Similarly, when I run my application through Eclipse, I can the argument to my Run Configuration, within the Arguments tab.

This works great when you have a single Run Configuration, or at least a small number of stable Run Configurations. But I’ve found an issue when running unit tests through Eclipse. It seems that whenever you run a JUnit test in an ad-hoc manner (for example, right-clicking on a test class and selecting Run As > JUnit Test) Eclipse will implicitly create a Run Configuration for that test. This can result in numerous run configs that you didn’t even know you’d created. That in and of itself isn’t a problem. However, if your application code is expecting a certain VM argument to be passed in, how can you pass that VM argument in to your test run?

Initially when I encountered this problem, I found a solution that didn’t scale very well. Essentially I would run a unit test for the first time, allow Eclipse to create the associated Run Configuration, and let the test error out. Then I would open the Run Configurations window, find the newly-created configuration, click into the Arguments tab and add my -D argument. At that point, I could re-run my test successfully.

It turns out there’s a better way. You can configure Eclipse to always, by default, include one or more VM arguments whenever it launches a particular Java runtime environment. To do this, open Eclipse’s Preferences window. Expand the Java section and select Installed JREs. Then in the main content window, select the JRE that you are using to run your project, and click the Edit… button. A dialog will appear, with an entry field labeled Default VM arguments. That’s where you can enter your VM argument;for example, -Dcom.mycompany.myarg=abc123. Close the window, and from then on, any unit tests you run will automatically pass that argument to the VM.

There are of course a few downsides. The first is that, as a preference, this setting won’t be included with your project (of course, this could also be seen as a benefit). Secondly, this preference is tied to a specific JRE, so if you test with multiple JREs, you’ll need to copy the argument for all JREs. Still, it’s clearly a workable, scalable solution.

Easily Manage Properties in your Java / Spring application

Question to the Java developers out there: properties are easy, right? All you need to do is to type up some key/value pairs in a simple file, read that file in when your application starts up (Java makes that a no-brainer), and refer to the appropriate property in your application code. If you’re using Spring, it’s even easier; just configure your beans in your app context XML file.

Well, that’s fine for a simple application that you’re deploying to your local test server. But for a production ready app, things are a little more complication. There are typically two things you’ll need to be able to deal with:

  1. You’ll like have different servers–test, staging, production, etc–each with their own different properties. For example, your test server will likely have different database credentials and connection URLs than your production server.
  2. You won’t want to store all of your properties in plaintext.
What we need is a way to separate the properties that differ across environments. Furthermore, we want to be able to encrypt some of these properties in case our application falls into the wrong hands.

Separate properties by environment

Let’s look at how we’d typically set properties in a Spring web application. For our purposes here, we’ll focus on setting our datasource’s properties: username, password, url, and the JDBC driver class name.
These would typically be set in your spring config file like so:
<bean id=“dataSource”
class=“org.springframework.jdbc.datasource.DriverManagerDataSource”>
<property name=“driverClassName” value=“com.mysql.jdbc.Driver” />
<property name=“url” value=“jdbc:mysql://127.0.0.1:3366/my_db” />
<property name=“username” value=“joe” />
<property name=“password” value=“foobarbaz” />
</bean>
Of course, any of these properties might change as you deploy to a different environment. Your production database might be running on its own server, for example. And you certainly wouldn’t want to use the same credentials in production as you do on your test server… right?
So our first step is to externalize these properties into a separate file. Let’s create a file called db.properties. This file should go somewhere in our classpath; for example, in com/mycompany/config in your compile target directory path. This file will contain our data source values, like so:
db.driver=com.mysql.jdbc.Driver
db.url=jdbc:mysql://127.0.0.1:3366/my_db
db.username=joe
db.password= foobarbaz
Now, how can we use this properties file? For this, Spring provides a handy class, org.springframework.beans.factory.config.PropertyPlaceholderConfigurer. This class takes a list of property file locations. It will read all of the files in the list, and store their properties to use as placeholder replacements.
To use a PropertyPlaceholderConfigurer, simply declare it as a bean:
<bean id=“propertyPlaceholderConfigurer”
class=org.springframework.beans.factory.config.PropertyPlaceholderConfigurer>
<property name=“locations”>
<list>
<value>classpath:com/mycompany/config/db.properties
</value>
</list>
</property>
</bean>
Now we can replace are hard-coded properties in our spring config file with these placeholders:
<bean id=“dataSource”
class=“org.springframework.jdbc.datasource.DriverManagerDataSource”>
<property name=“driverClassName” value=${db.driver}/>
<property name=“url” value=${db.url}/>
<property name=“username” value=${db.username}/>
<property name=“password” value=${db.password}/>
</bean>
At runtime, Spring will replace the ${…} tokens with their property values.
That works great, but what we really want is separate config files, one per environment. To do this, we copy our db.properties file to db-dev.properties and db-prod.properties (this assumes that we have two environments, development and production; of course, make as many copies as you have distinct environments.) Those files should of course continue to reside on our classpath. And of course, the values of each of the four properties should be changed to match the data source settings for the specific environment.
At runtime, we’ll want Spring to read the current environment’s db properties file. Fortunately, when it performs placeholder replacements, Spring will look for values not just read in by the PropertyPlaceholderConfigurer, but also system properties and VM arguments as well. So what we can do is to pass a VM argument on our startup script. This value will define the current environment. So in our dev environment we’d add this to our startup script:
    -Dcom.mycompany.env=dev
while in production we’d add this:
    -Dcom.mycompany.env=prod
Last, we adjust our PropertyPlaceholderConfigurer location to tell it which configuration file to read in.
<bean id=“propertyPlaceholderConfigurer”
class=org.springframework.beans.factory.config.PropertyPlaceholderConfigurer>
<property name=“locations”>
<list>
<value>classpath:com/mycompany/config/db-${com.mycompany.env}.properties
</value>
</list>
</property>
</bean>
The highlighted token above will be replaced with the value of com.mycompany.env set in our startup script. As a result, our PropertyPlaceholderConfigurer will read in the environment-appropriate file, and our dataSource bean will be populated with the environment-appropriate values.

Encrypt your credentials

Our second goal is to keep from bundling our database credentials in plaintext when we package and distribute our web application. To do this, we are going to override Spring’s PropertyPlaceholderConfigurer with our own implementation. This implementation will do one additional thing: when it encounters a property whose name ends with “-enc”, it will assume that the value is encrypted, and therefore decrypt the value just after reading it in.
First, let’s assume that we have written a class called DataEncrypter, containing two methods:
public String encrypt(String rawValue);

public String decrypt(String encryptedValue);

Their functions should be obvious; encrypt() takes a plaintext String and converts it to an encrypted String; decrypt() reverses the process. Both methods should of course rely on the same key(s). This tutorial will skip what an actual implementation of each method might look like; that’s for the security experts to provide. For information, look up information about the javax.crypto package. Instead, we’ll assume that a good implementation has been written.
The first thing we’ll want to do to encrypt our database credentials with our DataEncrypter instance, and put those encrypted values into our properties files. The most straightforward way to do this is to simply create a Java class with a main(String[] args) method, which uses our DataEncrypter to encrypt a value passed as args[0]:
public static void main(String[] args) {
DataEncrypter encrypter = …; // obtain an instance
System.out.println( encrypter.encrypt(args[0]) );
}
Run that class once per property that you want to encrypt; alternatively, you can modify it to expect multiple properties in args, and encrypt them all in one run. Next, we’ll swap those values in to the properties file in place of their plaintext version. We’ll also rename to property with an “-enc” suffix.
db.driver=com.mysql.jdbc.Driver
db.url=jdbc:mysql://127.0.0.1:3366/my_db
db.username-enc=f7BjAyDkWSs=
db.password-enc=4Q7xTCr5hZC9Ms6iTSjG3Q==
So how will those values be decrypted? We’ll need to create our own subclass of PropertyPlaceholderConfigurer (which we’ll call DecryptingPropertyPlaceholderConfigurer). PropertyPlaceholderConfigurer contains one important method that we’ll want to override:
protected void convertProperties(Properties props)
This method read in the properties from any file found in its list of file locations. We’ll want to look for any properties whose name ends with “-enc”, and invoke our DataEncrypter’s decrypt() method:
public class DecryptingPropertyPlaceholderConfigurer extends PropertyPlaceholderConfigurer {
private static final String SUFFIX_ENC = “-enc”;
private final DataEncrypter encrypter = …; // obtain an instance
private final Logger log = LoggerFactory.getLogger (getClass ());
@Override
protected void convertProperties(Properties props) {
// props refers to the contents of a single properties file
Enumeration<?> propertyNames = props.propertyNames();
while (propertyNames.hasMoreElements()) {
String propertyName = (String)propertyNames.nextElement();
String propertyValue = props.getProperty(propertyName);
// look for names such as password-enc
if (propertyName.endsWith(SUFFIX_ENC)) {
try {
String decValue = encrypter.decrypt(propertyValue);
propertyValue = decValue;
// normalize the property name by 
// removing the “enc-” prefix
propertyName = propertyName.substring(
0, propertyName.length() – SUFFIX_ENC());
} catch (EncryptionException e) {
log.error( String.format(
  “Unable to decode %s = %s”, propertyName, propertyValue), e);
throw new RuntimeException();
}
}
props.setProperty(propertyName, propertyValue);
}
}
}
Note that we strip the “-enc” suffix from each encoded property that is encountered. That we, we can continue to refer to our data source password, for example, as db.password rather than db.enc-password. Note also that if we encounter an error decrypting a property, we log the issue and throw a RuntimeException. This is generally the correct thing to do; we don’t want our application to run with partially-incorrect properties. One thing to note here is that you might want to remove the logging of the propertyValue. A common encryption problem is one where someone forgot to encrypt the value before adding it to the properties file. In such a case, you probably would not want the plaintext value hanging out in your log file.
The last thing to do is simply plug our subclass into our Spring config file:
<bean id=“propertyPlaceholderConfigurer”
class=“com.mycompany.DecryptingPropertyPlaceholderConfigurer”>
<property name=“locations”>
<list>
<value>classpath:com/mycompany/config/db-${com.mycompany.env}.properties
</value>
</list>
</property>
</bean>
Now, an important caveat is that this is not an end-all, be-all solution to securing your credentials. This approach is only as strong as your encryption algorithm, and it will never ensure 100% security. It’s not a substitute for simply ensuring that your source code and your webapp bundle remain only in your hands (or for taking other measures such as restricting access to your database server, not reusing passwords, etc). But should someone else get get ahold of your credentials, this approach should at least buy you enough time to change your credentials to prevent unauthorized access.

Done!

Now that you’ve set up your infrastructure, it should be easy to see how to set additional properties, whether in the same files we’d created above or in new files that you might create. Managing properties is once again very easy, but now it’s also very flexible and a tad more secure than it was before.